|
Barcode Scanning on Intermec Windows Mobile/PocketPC Scanners
|   |
|
Barcode Scanning on Intermec Windows Mobile/PocketPC Scanners
| |
QuickStart Guide to: Barcode Scanning on Intermec Windows Mobile/PocketPC Scanners
Intermec manufactures several models of Windows Mobile/PocketPC rugged handhelds with integrated barcode scanning capability. This QuickStart Guide shows you how to add Intermec Windows Mobile/PocketPC barcode scanning support to your Satellite Forms application, quickly and easily.
This QuickStart Guide contains plenty of screenshots to guide you through the process step by step, but don't let the length of this article scare you: the entire process of building the barcode scanning test application for the Intermec PocketPC scanners should only take about 15 minutes.
In order to control the Intermec barcode scanner, we'll utilize the IntermecScan plugin extension that is included with Satellite Forms. This extension is written to work with the Intermec scanner library that is preinstalled on most Intermec Windows Mobile/PocketPC scanners.
Okay, let's build an Intermec Scan Test sample application step by step:
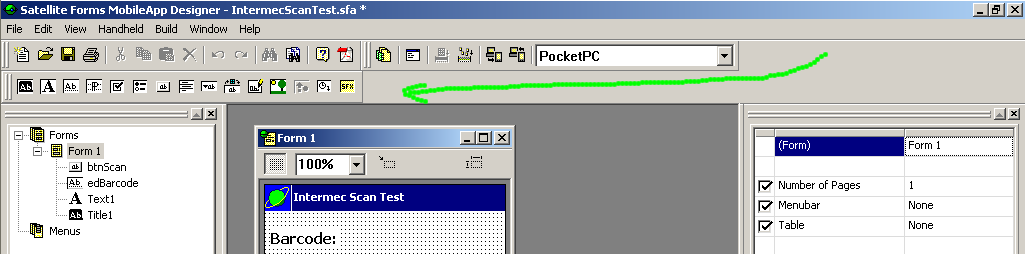
Step 1. Start a new project in Satellite Forms MobileApp designer, and select the PocketPC platform target. A default form named Form 1 will be created, ready for you to add controls to. Click in the middle of the form, so that the Control Palette Toolbar becomes active. Let's add a form Title control, with the title text set to Intermec Scan Test. Next add a text control with the label Barcode: and below that add an edit control named edBarcode that stretches across the width of the form. Let's add a button control below that named btnScan, labeled SCAN, using the Tahoma Bold 10 font, and enlarge it to make it easy to tap on with a finger. Leave the button action set to No Action for now. Your form should look like this:
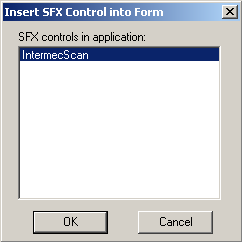
Step 2. The next step is to add the IntermecScan control extension to our project. Click on the Manage Extensions toolbar icon which looks like this: ![]() A list of available extensions is displayed. Do not select the one at the top named Bar Code Reader. Scroll down the list, and select the IntermecScan extension, then click OK:
A list of available extensions is displayed. Do not select the one at the top named Bar Code Reader. Scroll down the list, and select the IntermecScan extension, then click OK:

Step 3. Step 3. The IntermecScan extension is a custom SFX control, and not just a plugin script extension. Although it is a custom control, the control is not actually visible to the end user: it is only visible in form design view of MobileApp Designer. Because it is a custom control, an icon is added to the Control Palette toolbar so that you can click on the icon to add the control to your forms. The SFX icon looks like this ![]() and is added to the right end of the Control Palette toolbar. If you do not see it, there's a good chance that part of the Control Palette toolbar is simply being cut off because the MobileApp Designer window is not wide enough. That's easy to solve, we'll just grab the Control palette toolbar "handle" and drag it down to the next line in the MobileApp Designer desktop. Now we can see all the Control palette toolbar icons, like this:
and is added to the right end of the Control Palette toolbar. If you do not see it, there's a good chance that part of the Control Palette toolbar is simply being cut off because the MobileApp Designer window is not wide enough. That's easy to solve, we'll just grab the Control palette toolbar "handle" and drag it down to the next line in the MobileApp Designer desktop. Now we can see all the Control palette toolbar icons, like this:
Okay good, we can see all the toolbar icons now.
So, click on the SFX custom control toolbar icon so that we can add it to our form. It's possible you might have more than one custom control on a form and they all share the same toolbar icon, so a selection box appears to let you choose the custom control you want, like this:
Click OK to select it, and the control then appears on our form as a little barcode symbol. Remember, this custom control is not visible to the end user. Let's move it out of the way so it does not overlap other controls, so your form should now look like this:

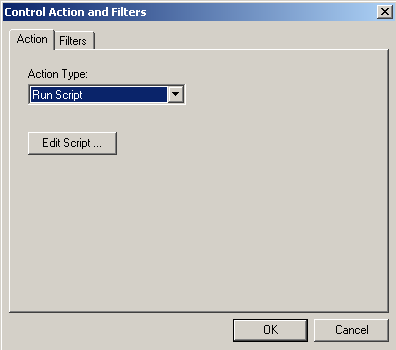
The default name that appears for the scanner control is IntermecScan1, and we'll leave it at that default. With the scanner control selected, click the Edit Action button in the control properties, and select Run Script from the Action Type droplist. This is the OnClick script for the scanner control, and this event will be fired when a barcode is scanned.
Step 4. Alright, now we're getting into the thick of things: here is where we decide what to do when a barcode is scanned. Click on Edit Script and the blank script editor window will open up. In this script, we are going to use a script method of the scanner control to obtain the barcode data that was scanned and place it into the edBarcode edit control on the form. Here's the script code to type in (feel free to copy & paste right from this QuickStart Guide article):
'this OnClick event is fired when a barcode is scanned
edBarcode = IntermecScan1.GetScanData
Now, let's make it so the onscreen SCAN button can trigger the barcode scan, in addition to the hardware scan buttons on the Intermec device. Select the SCAN button on the form, and click on Edit Action in the control properties. Select Run Script from the list of actions, then click on Edit Script. Type in this script to trigger the scan when the button is tapped:
'start scanner with timeout of 3000 ms
IntermecScan1.DoScan(3000)
Step 5. Okay, we need to do a couple more things to make barcode scanning work. What we need to do is to make sure the device we're running on is really an Intermec barcode scanner, and if so, make sure the scanner is enabled. If it is not an Intermec device, then we'll hide the btnScan control on the form. So, in the form AfterOpen event script that gets fired when the form is opened, confirm the scanner is enabled like this:
'if device is Intermec barcode scanner then
'confirm scanner is enabled
if IntermecScan1.IsIntermecScanner = True then
'confirm that scanning is enabled
if IntermecScan1.IsScannerEnabled = False then
IntermecScan1.ScannerEnable
endif
else
'warn user about no scanner
edBarcode = "Not Intermec scanner"
'hide the SCAN button
btnScan.visible = false
endif
That's about it for the barcode scanning stuff. Let's give the application a name, compile it, and test it out on the handheld.
Step 6. Click on the Edit > Project Properties menu, and give our application the name Intermec Scan Test, like this:
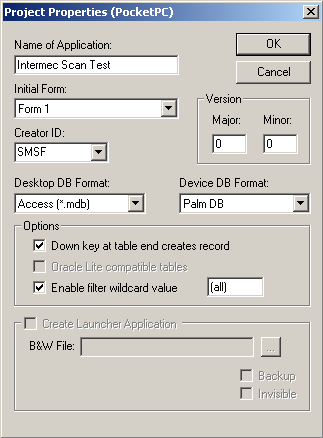
Click OK, and then save your project. Name it Intermec Scan Test.sfa.
Now, compile the application by pressing the F7 hotkey (Rebuild All). If the compiler finds any typos, fix them, and then Rebuild All again. Next, connect the Intermec scanner to the cradle or sync cable, and use the Handheld > Download App & Tables menu option (or press the F5 hotkey) to download the application to your Intermec Windows Mobile/PocketPC scanner device. Launch the SatForms SDK app on the handheld, select Intermec Scan Test from the list, and you are ready to scan.
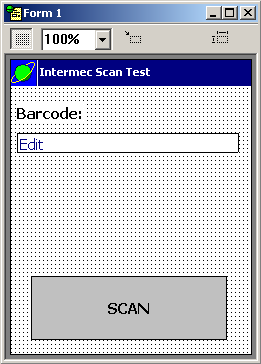
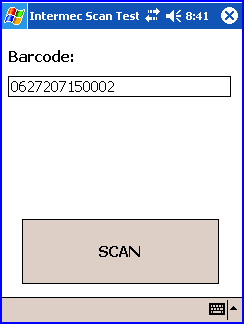
Point the scanner at a nearby barcode, press one of the scan buttons on the Intermec unit, and you the scanner should read the barcode and play a confirmation beep. Here's a sample screenshot from a Intermec CN2B screen:
Congratulations! You've just learned how to scan barcodes on Intermec Windows Mobile/PocketPC scanners with Satellite Forms!
There are plenty of additional functions in the scanner control to give you even more detailed control over the scanning process, but you've got the basic scanning function covered just by applying what you learned in the QuickStart Guide above.
Additional Sample Projects:
\Satellite Forms 7\Samples\Projects\IntermecScan\IntermecScan.sfa
Keywords: Intermec, barcode, scanner, quickstart, PocketPC, Windows Mobile, CN2B
KB ID: 10081
Updated: 2007-12-03
Satellite Forms KnowledgeBase Online